Slinza Beast Tribal: The Ultimate Fight Club Guide
If you like to smash through defenses with massive primeval monsters and use your commander as a repeatable removal engine, then this is the perfect strategy for you.
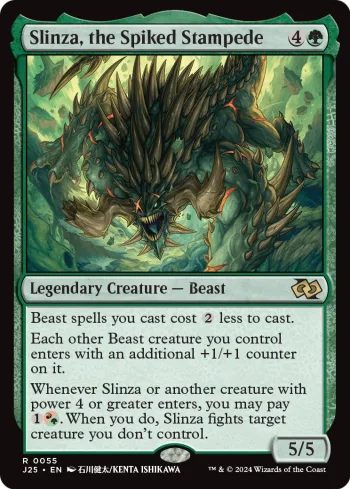
Slinza, the Spiked Stampede is a powerhouse Gruul commander that solves the archetype’s biggest problem: interaction. By reducing the mana cost of your heavy hitters, distributing permanent power boosts, and turning every single high-power creature deployment into an optional fight trigger, Slinza allows you to build a menacing board presence while actively policing your opponents’ threats.
Core Strategy Pillars
- Cheating the Mana Curve: Slinza’s generic cost reduction transforms expensive mid-game threats into hyper-efficient aggressive plays.
- Fight-Based Board Control: Weapons and utility pieces abuse Slinza’s triggered ability to pin down key opposing targets without expending dedicated removal cards.
- Explosive Synergies: A mix of heavy trample damage, passive burn triggers, and infinite token generators completely overwhelms standard casual tables.
The deck:
Beast Tribal
How to Pilot: Mulligan & Early Turns
Setting up your primeval mana acceleration and preparing for the ultimate fight-club lockdown.
The Perfect Opening Hand (The Mulligan)
When piloting this Slinza build, your opening hand dictates your structural momentum. Because our beast strategy relies heavily on hitting green mana early while preparing to deploy heavy threats, you cannot afford a slow, passive start. Your ideal 7 cards must contain:
- At least 3 Lands: Crucially containing early basic Forests or untapped green sources to guarantee you can cast your low-cost ramp spells on time.
- Early Mana Acceleration: A 2-mana ramp piece like Rampant Growth, Patchwork Banner, or a creature-based reducer like Goblin Anarchomancer.
- Continuous Value Engine: A card draw element such as Garruk’s Uprising or Elemental Bond to keep your hand fully loaded as your massive threats enter the battlefield.
Mulligan Rule: If your hand contains high-cost finishers like Craterhoof Behemoth, Ezuri’s Predation, or heavy utility enchantments without early ramp, ship it back. Prioritizing active low-cost accelerators and balanced color fixing over uncastable late-game bombs will yield a much higher win percentage.
Early Game Strategy (Turns 1-3)
Your core focus during the first three turns is resource fixing and board development, not rushed aggression. Do not attempt to force high-cost plays before establishing your synergistic framework.
- Turns 1 & 2: Secure your green mana early using dual lands or standard ramp spells like Rampant Growth. Deploy early mana accelerators like Armored Scrapgorger to guarantee you jump ahead of the standard mana curve.
- Turn 3: This is your pivotal setup turn. Cast active value engines like Garruk’s Uprising or deploy key utility cards like Herald’s Horn to prepare for your commander’s arrival. If your mana ramp went unchecked, you can deploy your commander early, but ensure you have a protection layer like Rhythm of the Wild active, or keep a red/green source open to utilize Slinza’s optional fight ability the moment she touches the field.
Comparative Analysis
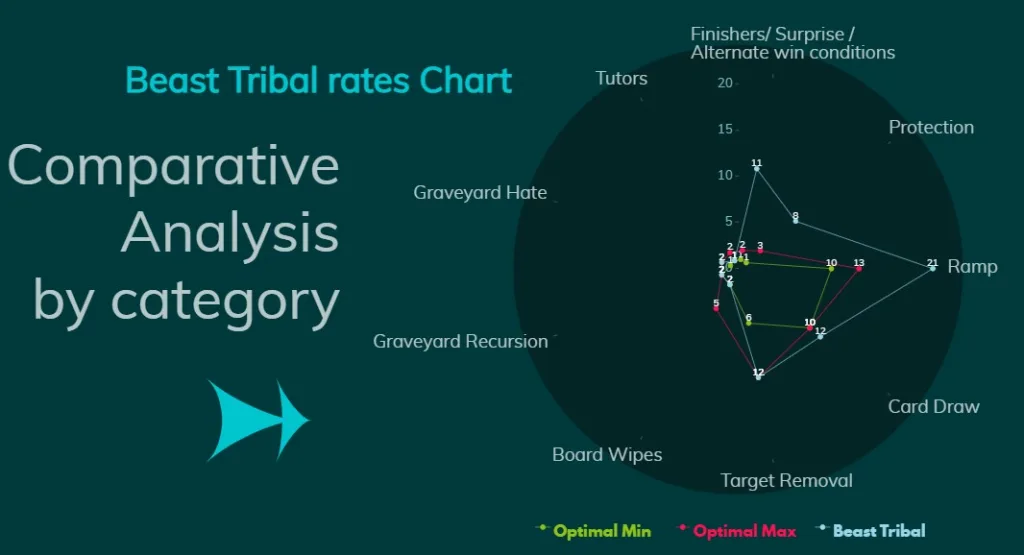
Let’s see how the deck compares to the general ratios of my deckbuilding guide.
36 Lands
21 Ramp: Armored Scrapgorger, Goblin Anarchomancer, Arcane Signet, Sol Ring, Loot, the Nexus, Krosan Warchief, Loot, Exuberant Explorer, Goreclaw, Terror of Qal Sisma, Kona, Rescue Beastie, Radagast of Rhosgobel, Slinza, the Spiked Stampede, Rampant Growth, Cultivate, Herald’s Horn, Patchwork Banner, Rhonas’s Monument, Castle Garenbrig, Mosswort Bridge, Outcaster Trailblazer, Hungering Puppetbeast, Gumato
12 Target Removal: Manglehorn, Gemrazer, Slinza, the Spiked Stampede, Coliseum Behemoth, Gruul Ragebeast, Stump Stomp, Bridgeworks Battle, Beast Within, Khalni Ambush, Warstorm Surge, Contested Cliffs, Sawtusk Demolisher
2 Board Wipes: Ezuri’s Predation, Blasphemous Act
2 Graveyard Recursion: Grave Sifter, Paleoloth
2 Graveyard Hate: Scavenger Grounds, Armored Scrapgorger
1 Tutors: Woodland Bellower
8 Protection: Frenzied Baloth, Krosan Warchief, Anara, Wolvid Familiar, Spellbreaker Behemoth, Spearbreaker Behemoth, Circle of Flame, Wrap in Vigor, Inspiring Call, Rhythm of the Wild
11,5 Card Draw: Wirewood Savage, Woodland Liege, Neyith of the Dire Hunt, Elder Gargaroth, Garruk’s Packleader, Coliseum Behemoth (1/2), Return of the Wildspeaker, Herald’s Horn, Elemental Bond, Garruk’s Uprising, Bonders’ Enclave, Outcaster Trailblazer
11 Finishers/ Surprise /Alternate win conditions: Thunderfoot Baloth, Caller of the Pack, Coliseum Behemoth, Siege Behemoth, Craterhoof Behemoth, Return of the Wildspeaker, Collective Inferno, Unnatural Growth, Warstorm Surge, Kessig Wolf Run, Aether Charge
As we see form the comparative analysis, the rates per category are very good. We see Ramp and Finishers to be far above the optimal max average. Card draw and Protection are also highlights of the deck.
Core Synergies & Combos
Unlocking the true potential of your herd with hidden interactions and game-ending engines.
The Infinite Herd Machine
While this deck thrives on raw combat damage and aggressive board presence, it hides a completely lethal, infinite creature combo that can end the game on the spot. The interaction requires two specific pieces on your board:
- Herd Baloth: A crucial beast that creates a 4/4 Beast token whenever one or more +1/+1 counters are placed on it.
- Ivy Lane Denizen: An elf companion that lets you put a +1/+1 counter on any creature you control whenever a green creature enters the battlefield under your control.
How it works: When a green creature enters the battlefield, Ivy Lane Denizen triggers, allowing you to place a +1/+1 counter on Herd Baloth. The counter triggers the Baloth, creating a green 4/4 Beast token. Because that token is a green creature, it re-triggers the Denizen, letting you place another counter on the Baloth. This loop repeats infinitely, resulting in an infinitely large Herd Baloth and an infinite army of 4/4 Beast tokens.
High-Power Synergy Matrices
Beyond the infinite loop, the deck relies on overlapping passive triggers that turn every single creature deployment into an absolute nightmare for the rest of the table.
- Passive Burn Infrastructure: Deploying Aether Charge turns your strategy into a non-combat threat. It deals 4 damage directly to an opponent’s face every single time a Beast touches the field. Combined with Warstorm Surge, your creatures can completely incinerate life totals before the combat phase even begins.
- The Counter Multiplication: Cards like Hardened Scales and Bloated Contaminator amplify the +1/+1 counters Slinza automatically hands out, transforming small utility creatures into massive, towering threats in a single turn cycle.
- Explosive Mana Scaling: Deploying Loot, the Nexus alongside Slinza creates a massive mana engine. Because Slinza’s counters ensure your creatures have highly varied, staggered power stats, Loot can easily tap for 4 to 5 mana of any color, letting you hard-cast your heaviest bombs ahead of schedule.
Mid-Game & Winning Conditions
Transitioning from board setup to complete combat dominance and closing out the table.
Dominating the Mid-Game
Once you cross into turns 4 through 6, your engine should be fully online. With Slinza on the battlefield, every creature spell you cast acts as a high-value tempo swing. The mid-game is all about converting your cost reductions into mana velocity, card advantage, and board suppression:
- Discounted Mana Engines: Slinza’s cost reduction turns mid-game Beasts like Gumato and Hungering Puppetbeast into 3-mana powerhouses. Gumato enters as a vigilant 5/6 that taps for


, while Hungering Puppetbeast arrives as a 6/6 with a Heartwood token for extra mana, hexproof protection, or surprise trample. - Card Velocity Chain: With engines like Elemental Bond or Wirewood Savage out, chaining discounted beasts allows you to draw through your deck effortlessly, replacing every threat you deploy.
- Symmetrical Fighting Control: Use Slinza’s optional fight triggers alongside pieces like Neyith of the Dire Hunt or Gruul Ragebeast to pick off opposing utility creatures, blockers, or enemy commanders while drawing extra cards off the combat interactions.
- Cheating the System with Kona: Utilize Kona, Rescue Beastie by sending her to attack safely while granting her indestructible via Anara, Wolvid Familiar. Her post-combat Survival trigger lets you cheat massive, high-mana threats straight out of your hand completely free.
Securing the Victory
This deck does not rely on chip damage to win; it relies on overwhelming, unstoppable combat steps that completely wipe out life totals in a single turn. Your primary avenues to victory include:
- The Behemoth Overrun: Powered out early by burst ramp like Gumato, the premier finisher is dropping Craterhoof Behemoth onto an established board of beasts. Combined with the natural trample from cards like Thunderfoot Baloth and the raw doubling power of Unnatural Growth, your combat step will deal hundreds of points of trample damage.
- Quartzwood Token Avalanche: Connecting with your large, trampled attackers while Quartzwood Crasher is active creates massive, scaling Dinosaur Beast tokens. These tokens enter with Slinza’s counters and immediately represent lethal threats for the next turn cycle.
- Unblockable Stompy: When opponents hide behind a massive wall of blockers, resolve Siege Behemoth. This allows your entire attacking army to assign their combat damage as though they weren’t blocked at all, bypassing defenses entirely to strike opponents directly.
Advanced Rules & Synergy Tips
Navigating complex combat triggers and mastering hidden technical layers to outsmart the table.
Weaponizing Opponent Turn Triggers
One of the most commonly misplayed aspects of Slinza involves her fight tracking logic. Slinza’s removal trigger states: “Whenever Slinza or another creature with power 4 or greater enters the battlefield under your control, or a creature with power 4 or greater enters the battlefield under an opponent’s control…”. This opens up massive tactical plays:
- Policing Opponent Drops: When an opponent resolves a utility engine or a commander with power 4 or greater, Slinza instantly triggers on your board. By paying


, you can immediately force Slinza to fight that creature on their turn, ambushing their plans before they can even untap. - The “May” Clause Safety Net: The fight ability is completely optional. If an opponent drops a colossal 12/12 monster, you are never forced to run Slinza into a lethal situation. Simply decline the trigger and maintain your board state.
Stack Interaction & MDFC Mechanics
To extract maximum value out of your deck’s moving parts, keep these vital interactions in mind during active phases:
- Rhythm of the Wild Layering: When a beast enters while Rhythm of the Wild is active, it receives a +1/+1 counter from Slinza and Riot simultaneously. If you choose a +1/+1 counter for Riot, a creature that normally enters as a 3/3 will hit the field as a 5/5, instantly clearing the threshold to trigger cards like Garruk’s Uprising for card draw.
- MDFC Flexibility: Spells like Bridgeworks Battle and Stump Stomp count as spells in your hand but double as land sources. If you reveal them via Loot, Exuberant Explorer or flip them through top-deck effects, they cannot be played as lands from the top of your library, protecting your standard land drops for the turn.
- Kona Survival Phase Control: Kona, Rescue Beastie triggers at the beginning of your postcombat main phase if she is tapped. If she was blocked and survived combat, or tapped using utility triggers, her ability triggers before your main phase actions. You can use this window to drop a massive card draw piece or a creature threat, gaining active utilization of it during the remainder of your turn.
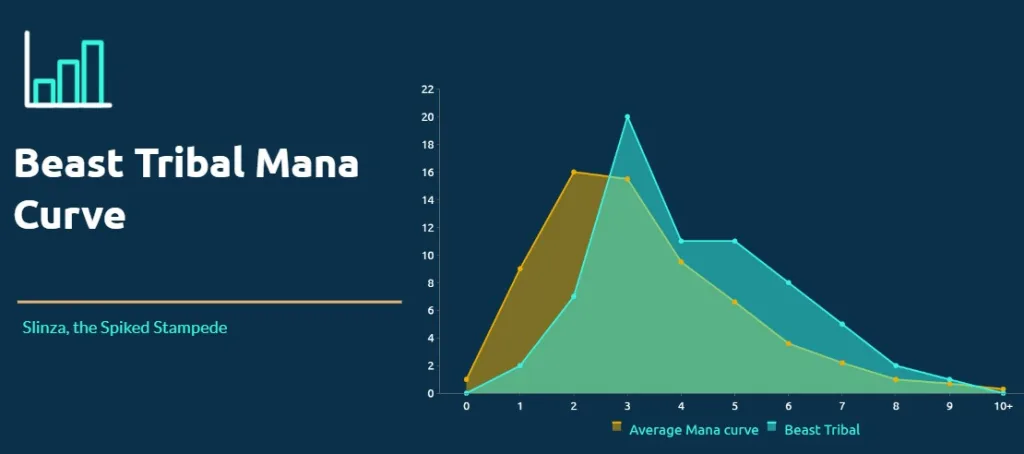
Let’s see some more statistics about our deck. Some important info to care about is the mana curve and the card type distribution, as it can help us understand better our deck and may indicate where there is space for improving it.
Mana Curve
The mana curve a shortage at 1-2 drop positions, a spike at 3 drop position and a high rate at 4-7 drop positions. Overall the curve shows the high cmc of our Beasts, but our commander can help trim it down.
Card Type Distribution
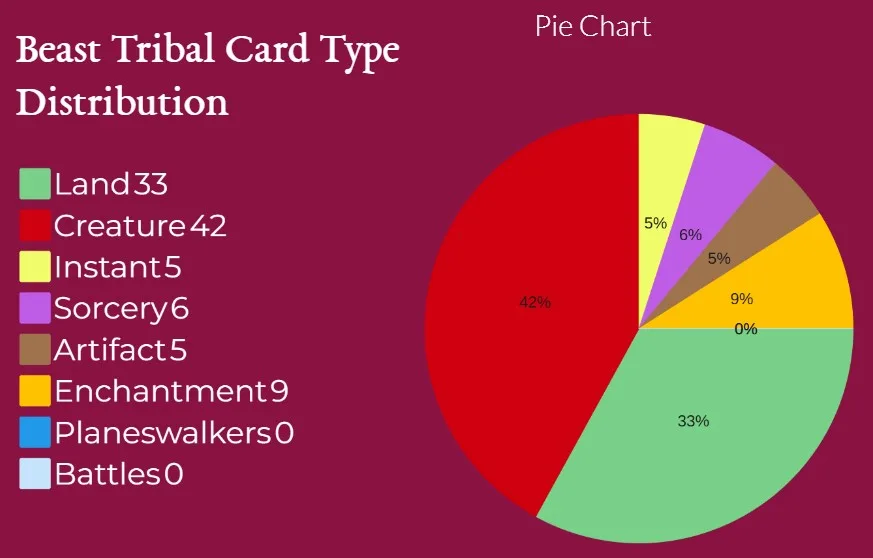
The Beast Tribal Card Type Distribution shows the dominant creature-heavy tribal theme with 42 creatures. Enchantments category follow with 9 cards. Artifacts, Instants and Sorceries are less frequent at 5, 5 and 6 cards.
Of course statistics and comparative analysis are great tools but they don’t always tell the whole truth, since many factors like synergy and combo pieces are hard to be measured numerically. For example in this deck, with all the deck build around Slinza, the Spiked Stampede and our fight synergy, we get amazing target removal from our commander that is not shown in statistics.
Deck Power Level Assessment
Analyzing structural optimization, engine efficiency, and final placement within the commander brackets.
Why does it rank at PL 8.5?
Built around Slinza, the Spiked Stampede’s cost-reduction and fight engine, this Gruul Beast list pairs explosive mana acceleration with a clean infinite combo finish. It comfortably sits at a Power Level 8.5, punishing slower tables while threatening lethal board states out of nowhere:
- Discounted Mana Velocity: With Slinza reducing Beast costs by
, mid-game engines like Gumato and Hungering Puppetbeast deploy for just 3 mana while immediately generating burst mana (

or Heartwood tokens) to chain multiple threats in a single turn. - Deterministic Infinite Combo: Pairing Ivy Lane Denizen with Herd Baloth gives the deck a two-card loop that creates infinite 4/4 Beast tokens and infinite power-4+ ETB triggers on the spot.
- Relentless Draw & Board Presence: Entering with an extra +1/+1 counter ensures almost every Beast immediately triggers 4+ power draw engines like Garruk’s Uprising, Elemental Bond, and Garruk’s Packleader, keeping your grip full through heavy removal.
Great news! Now you can buy the best custom Beast tokens made by Mystic Tokens to accompany your Beast Tribal deck! Buy now on Cardmarket!
If you liked the deck, don’t forget to revisit the article after every major new release as I will try to keep my decks updated and examine any potential upgrades. If you want to keep being updated, you can follow mtgbudgetcommander.com on social media (facebook, twitter, instagram, pinterest, linkedin, reddit, tumblr, medium).
If you like my tribal series, you can check my other tribal decks.